
Dynamic remarketing on Shopify allows you to show personalized ads featuring the exact products visitors browsed on your store. This strategy can help recover up to 70% of abandoned carts, with ads that include product images, prices, and details. By linking Google Merchant Center to Google Ads, installing remarketing tags, and ensuring product IDs match, you can target shoppers who are already interested in your products.
Key Takeaways:
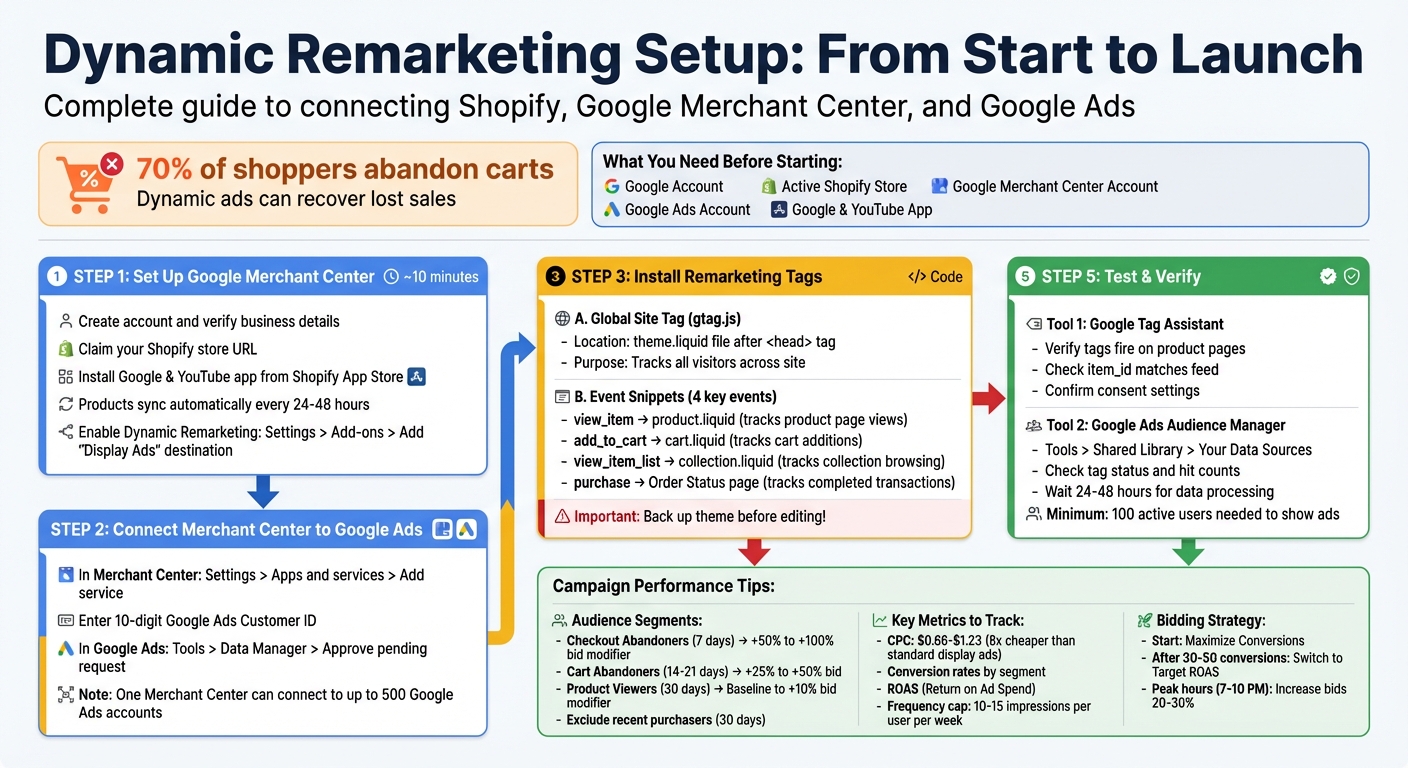
- Why it matters: 70% of shoppers abandon carts; dynamic ads can recover lost sales.
- What you need: A Google Account, Shopify store, Google Merchant Center, and Google Ads.
-
Setup steps:
- Sync Shopify products with Google Merchant Center using the Google & YouTube app.
- Install remarketing tags (Global Site Tag and Event Snippets) on your Shopify store.
- Ensure product IDs match between your Shopify store and Merchant Center feed.
- Optimization tips: Segment audiences (e.g., cart abandoners), exclude recent buyers, and monitor key metrics like CPC and conversion rates.
Dynamic remarketing leverages Google’s vast ad network to reconnect with high-intent shoppers, driving conversions and improving ad performance.
Complete Setup Guide for Dynamic Remarketing on Shopify with Google Ads
How to Setup Google Ads Dynamic Remarketing on Shopify (2026 Step-by-Step Guide)
sbb-itb-8b1a57a
Requirements Before You Start
To kick off your first dynamic remarketing campaign, you’ll need a few essentials: a Google Account, an active Shopify store, a free Google Merchant Center account, and a Google Ads account.
In this setup, the Merchant Center acts as your product database, while Google Ads powers the campaigns that showcase your products to potential customers.
You’ll also need to install the Google & YouTube app from the Shopify App Store. This free app automatically syncs your Shopify product catalog to the Merchant Center every 24 to 48 hours. It ensures your prices and inventory stay up-to-date without requiring manual updates.
Setting Up Google Merchant Center
Creating a Google Merchant Center account is straightforward and takes about 10 minutes. Start by visiting the Merchant Center website, signing in with your Google Account, and entering your business details. A crucial step here is verifying and claiming your Shopify store URL under the Business Information settings. This step confirms your ownership of the domain and allows Google to display your products.
Once your Merchant Center account is active, install the Google & YouTube app from Shopify’s App Store and connect it to the Merchant Center. This app uses Shopify’s Content API to automatically generate your product feed, pulling in details like product titles, descriptions, images, prices, and availability. There’s no need for manual feed creation or spreadsheet uploads.
After syncing your products, go to Settings > Add-ons in the Merchant Center. Find the "Dynamic Remarketing" card and click Add to enable it. This step is key - it activates the "Display Ads" destination, making your products eligible for dynamic remarketing ads. Without this, your products won’t appear in personalized ads.
Connecting Merchant Center to Google Ads
To link your Merchant Center to Google Ads, follow these two steps:
- In the Merchant Center, navigate to Settings > Access and services > Apps and services and click Add service. Enter your 10-digit Google Ads Customer ID, which you can find in the top-right corner of your Google Ads dashboard. Submit your request from here.
- Switch to Google Ads and go to Tools > Data Manager > Connected products > Google Merchant Center. You’ll see a pending request, which you’ll need to approve using admin access on both accounts.
Once the accounts are linked, Google Ads can access your product feed to create dynamic ads. A single Merchant Center account can connect to up to 500 Google Ads accounts, which is especially helpful if you manage multiple campaigns or collaborate with agencies. Additionally, this connection often integrates with Google Business Manager, streamlining your tools into one cohesive system.
Next, we’ll cover how to install remarketing tags on your Shopify store.
Installing Remarketing Tags on Your Shopify Store
Remarketing tags are a powerful way to track visitor behavior on your Shopify store. They allow Google Ads to display personalized ads based on what users viewed or added to their cart. To set this up, you'll need two key components: the Global Site Tag (gtag.js), which tracks all visitors, and Event Snippets, which monitor specific actions like product views or purchases.
Before diving in, make sure to back up your Shopify theme. You can do this by duplicating it. In your Shopify admin, go to Online Store > Themes > Actions > Duplicate. This step ensures you have a fallback if anything goes wrong during the installation process.
Adding the Global Site Tag and Event Snippets
To get your remarketing tag, log in to Google Ads and navigate to Tools > Shared library > Audience manager > Your data sources. On the Google Ads tag card, click Set up tag. For dynamic remarketing, choose "Collect specific attributes or parameters to personalize ads" and set your business type to Retail.
The Global Site Tag needs to be added to your theme.liquid file. In Shopify, go to Online Store > Themes > Actions > Edit code, and open theme.liquid from the Layout folder. Insert the tag right after the opening <head> tag. This ensures the tag loads on all pages, enabling the remarketing cookie and tracking visitors across your site.
Next, you'll add event snippets to track specific actions, like product views or cart additions. These snippets should follow the global tag and use Shopify's Liquid conditional logic. For instance, to track product page views, wrap the event snippet with {% if template contains 'product' %}. Use dynamic parameters such as {{ product.id }} for the product identifier and {{ product.price | money_without_currency }} for the price.
Important: Ensure that the id or ecomm_prodid parameter matches the format used in your Google Merchant Center feed. Shopify typically uses a format like shopify_US_{{ product.id }}_{{ product.variants.first.id }}. If the product IDs don’t align, your dynamic ads won’t display the correct products.
| Event Name | Shopify Template | Purpose |
|---|---|---|
view_item |
product.liquid |
Tracks when visitors view product pages |
add_to_cart |
cart.liquid |
Tracks when items are added to the cart |
view_item_list |
collection.liquid |
Tracks when visitors browse collections |
purchase |
Order Status page | Tracks completed transactions |
Adding Conversion Tracking to Checkout Pages
Tracking purchases requires a different approach since checkout pages use a separate template. In your Shopify admin, go to Settings > Checkout > Order processing and find the Additional Scripts box. Paste your conversion event snippet here, but make sure to wrap it with {% if first_time_accessed %} ... {% endif %}. This prevents duplicate conversions if the page is refreshed.
Replace static values with dynamic variables. For example:
-
Use
{{ checkout.total_price | money_without_currency }}for the total order value. -
Use
{{ checkout.subtotal_price | money_without_currency }}to exclude taxes and shipping. -
Add
{{ shop.currency }}for the currency and{{ order_number }}for the transaction ID.
Once everything is installed, test your setup. Use tools like Google Tag Assistant or Chrome's Network tab (filter for "collect") to verify that the tags are working. Run a test order and allow 24–48 hours for Google Ads to start recording conversions in your account.
With your tags in place and tracking correctly, you’re ready to fine-tune your campaigns for maximum impact.
Setting Up Product IDs for Dynamic Ads
Product IDs are the connection point between your Shopify store and Google Merchant Center. When a visitor lands on a product page, the remarketing tag sends a product ID to Google Ads. Google then uses this ID to pull the product's image, price, and description from your Merchant Center feed. If the ID from your site doesn’t match the ID in your feed, Google won’t know which product to show - leaving your dynamic ad blank.
This mismatch results in a "Required Parameters Don't Match" error in Google Ads, effectively halting your dynamic remarketing campaigns. Additionally, changing product IDs after campaigns are live resets the product’s transaction history and quality score, which can negatively impact ad performance.
Understanding Shopify Product ID Format
Shopify uses a standardized format for product IDs when working with Google: shopify_[COUNTRY_CODE]_[product_id]_[variant_id]. For example, a product in the U.S. might have an ID like shopify_US_7700617756895_42978160378079. The country code ensures that customers see the correct pricing and currency for their location - essential for stores operating in multiple countries.
| ID Component | Description | Example |
|---|---|---|
| Prefix | Static platform identifier | shopify_ |
| Country Code | Two-letter code for the target market | US |
| Product ID | Shopify's unique parent product ID | 7700617756895 |
| Variant ID | Shopify's unique variant ID (e.g., size) | 42978160378079 |
| Full Result | The complete string required for matching | shopify_US_7700617756895_42978160378079 |
To confirm the format Google is using, log in to Google Merchant Center and go to Products > All Products. Look at the ID column to see the exact format. This is your benchmark - your remarketing tags must send IDs in this exact structure.
Fixing Product ID Errors
One of the most frequent issues is a country code mismatch. Shopify’s native Google Channel often defaults to a shopify_US_ prefix in the tags, even if your Merchant Center feed uses a different prefix like shopify_IT_ or shopify_ZA_. This discrepancy triggers the "Required Parameters Don't Match" error.
To fix this, you’ll need to adjust your Liquid code in the remarketing tags. Use this format: shopify_US_{{product.id}}_{{product.selected_or_first_available_variant.id}}. Replace US with your target country code. Important: Always include .id for the variant object. Without it, the tag might return "ProductVariantDrop" instead of the correct ID.
If you’re using Google Tag Manager, update the JavaScript variables for "Product View", "Add to Cart", and "Purchase" actions to create the correct string: 'id': "shopify_US_" + product.product_id + "_" + product.variant_id. If your store serves multiple regions, set up a Lookup Table variable in Google Tag Manager to dynamically insert the correct country code based on the Page Hostname.
To ensure everything is working, use Google Tag Assistant to check the remarketing tag on your product pages. Confirm that the correct value is being passed in the id parameter. If your website sends a different attribute like SKU instead of the ID, you can use ID Rules in Google Merchant Center to map the SKU column to the ID attribute. This approach eliminates the need to modify your website code.
Testing and Verifying Your Setup
Once your product IDs are configured, it's time to ensure your remarketing tags are working properly. A malfunctioning tag can disrupt data collection for Google Ads, so this step is critical. Thankfully, Google provides free tools to help you verify everything in real time.
Using Google Tag Assistant for Verification

Google Tag Assistant, a Chrome extension, lets you see the data your tags are transmitting. Start by downloading and enabling the extension. Then, refresh your Shopify store to begin tracking activity on your site .
Visit a product page and click the Tag Assistant icon to check if the global site tag and view_item snippet are firing. The item_id (or ecomm_prodid) shown in Tag Assistant must match the Product ID in your Google Merchant Center feed exactly. For instance, if Tag Assistant shows shopify_US_7700617756895_42978160378079, but your Merchant Center feed uses 7700617756895, there's a mismatch. This discrepancy will prevent your dynamic ads from displaying the right products [26,37].
Also, check the Consent tab within Tag Assistant. If "ad_storage" and "ad_personalization" are marked as "denied", Google Ads won't process remarketing data. This often happens when visitors decline cookies or if the consent mode is improperly configured.
Finally, confirm that the view_item, add_to_cart, and purchase events are firing correctly on product pages, the cart page, and the purchase confirmation page. If your Shopify store uses an AJAX cart, make sure these events are tracked there as well [38,42].
Once you've verified tag activity with Tag Assistant, move on to confirm that Google Ads is receiving the data.
Validating with Google's Remarketing Tools
While Tag Assistant shows what’s happening on your site, you also need to ensure Google Ads is receiving the transmitted data. Log in to Google Ads and navigate to Tools > Shared Library > Audience Manager > Your Data Sources. Click "Details" on the Google Ads tag card. This section will display the status of your event snippets and the number of hits each parameter has received in the last 24 hours [37,39].
If you see a "Tag values don't match your feed values" alert, it means the item_id from your site doesn’t align with any Product ID in your Merchant Center feed. Download the list of non-matching values to identify the problematic products. Additionally, if more than 50% of your tag activity is missing required parameters (like value or google_business_vertical), Google Ads will flag this with an alert.
Next, check the Overview tab in your campaign for the Status review card. This card highlights up to two critical alerts and includes a "VIEW" option for a full list of setup issues, along with suggested fixes. Common warnings include:
- "List not populating" (the tag isn’t firing on every page)
- "Ads not showing" (your audience list has fewer than 100 active users)
- "Tag inactivity" (the tag hasn’t recorded hits in the last seven days) [37,43].
Keep in mind that remarketing ads won’t display until your audience list has at least 100 active visitors from the past 30 days [37,43].
After confirming data reception in Google Ads, double-check that nothing is interfering with tag firing. Disable all ad blockers, for your store’s domain before running tests. These extensions can block remarketing tags and lead to misleading results.
Improving Campaign Performance
Once your tags and data flow are confirmed, it’s time to fine-tune your campaigns to drive better conversions and improve ROAS. Dynamic remarketing campaigns can be a game-changer - remarketing ads often cost 8 times less per click compared to standard display campaigns. The secret lies in crafting well-defined audience segments and keeping a close eye on the right metrics.
Creating Remarketing Audiences
Instead of bombarding all visitors to your Shopify store with the same ad, tailor your audience lists based on specific user actions. Google Ads tracks events like view_item (product page views), add_to_cart (cart additions), and purchase (completed orders). Use these signals to create segmented lists that align with user intent.
Focus on high-impact segments like Checkout Abandoners, Cart Abandoners, and Product Viewers. With around 70% of shoppers abandoning their carts without completing a purchase, targeting these users is critical for recovering lost sales.
| Audience Segment | Intent Level | Recommended Window | Suggested Bid Modifier |
|---|---|---|---|
| Checkout Abandoners | Highest | 7 Days | +50% to +100% |
| Cart Abandoners | High | 14–21 Days | +25% to +50% |
| Product Viewers | Medium | 30 Days | Baseline to +10% |
| General Visitors | Low | 30 Days | -30% to -50% or Exclude |
Another key step is to exclude recent purchasers (typically within the last 30 days) from your remarketing campaigns. Showing ads to customers who have already bought a product wastes budget and can harm your brand’s image.
To extend your reach, consider using "Similar segments" to find new users with traits similar to your existing audiences or "In-market audiences" to target users actively exploring related products.
Set a frequency cap of 10–15 impressions per user per week to avoid ad fatigue. Overexposing your audience can inflate costs and reduce engagement. For bidding, start with the "Maximize Conversions" strategy to gather data, then transition to "Target ROAS" once you’ve hit 30–50 conversions.
With these audience strategies in place, you’re ready to focus on tracking the right metrics.
Tracking Campaign Metrics
Once your audiences are set, keeping a close watch on campaign metrics is vital for making informed adjustments. Focus on metrics that highlight how remarketing impacts the customer journey. Switch to data-driven attribution instead of last-click attribution to better evaluate remarketing’s role in driving conversions.
In your Google Ads dashboard, monitor cost-per-click (CPC), which for remarketing campaigns typically falls between $0.66 and $1.23 - much lower than standard display ads. Track conversion rates for each audience segment to see which groups deliver the best results. For example, checkout abandoners should convert at higher rates than general product viewers, which justifies their higher bid adjustments.
During peak shopping hours (7–10 pm), increase bids by 20–30% to take advantage of higher conversion opportunities.
Additionally, use Remarketing Lists for Search Ads (RLSA) to bid more aggressively on core keywords when a previous site visitor searches on Google. This approach combines the broad reach of Display remarketing with the high intent of Search, creating a powerful strategy to win back lost sales.
Next Steps
You've now completed the entire setup process - connecting Google Merchant Center to Google Ads, installing remarketing tags on your Shopify store, aligning product IDs, and refining audience segments and bidding strategies. Before hitting launch, double-check that the "Use dynamic ads feed for personalized ads" option is selected in your campaign's Additional Settings. This step ensures Google can use your Merchant Center feed to personalize ads with your product data.
Once your campaign goes live, allow Google about 48 hours to process tag data and build your remarketing lists. During this time, review the Status section in your campaign overview to confirm that parameters like ecomm_prodid, ecomm_pagetype, and ecomm_totalvalue are working properly. If you notice blank or generic ads, it often points to a mismatch between the product ID in your tag and the one in your Merchant Center feed.
Dynamic remarketing is a powerful tool for ecommerce businesses, as it reconnects shoppers with the specific products they viewed. With Google's vast network reaching over 92.5 billion visits each month across platforms like YouTube, Gmail, Display, and Search, this strategy offers a scalable way to recover lost sales.
If you encounter challenges with technical configurations, audience strategies, or common issues like tag firing errors or conversion tracking problems, Martin Monroe Creative provides expert support for Shopify stores running Google Ads campaigns. Their team specializes in syncing Shopify product IDs with Merchant Center feeds and creating advanced segmentation strategies to boost your ad performance.
To get started, consider launching a test campaign aimed at your highest-intent audience - such as cart abandoners - and expand your efforts as you collect conversion data.
FAQs
How do I know my Shopify product IDs match my Merchant Center feed?
To make sure your Shopify product IDs sync correctly with your Google Merchant Center feed, start by verifying that the product IDs in Shopify match the id attribute in your Merchant Center feed. Here's how you can do it:
- Export Your Shopify Product Data: Download your product data from Shopify and review the IDs to ensure they align perfectly with those in your Merchant Center feed.
- Check Custom Fields or Tools: If you're using custom fields or a feed management tool, confirm that Shopify's product IDs are correctly mapped. This step is crucial for ensuring dynamic remarketing functions as intended.
By taking these steps, you can avoid mismatches and ensure everything runs smoothly.
Why aren’t my dynamic remarketing ads showing any products?
If your dynamic remarketing ads aren't showing products, it could be due to setup problems. Start by confirming that your Merchant Center account is linked to Google Ads. Make sure the dynamic remarketing add-on is enabled, and double-check that your product feed has been uploaded correctly. Additionally, verify that your tags are properly set up and that Display Ads are permitted in your campaign settings. Addressing these areas should help get your products showing in your ads.
How can I avoid tracking duplicate purchases in Shopify?
To avoid duplicate purchase tracking in Shopify, it's crucial to set up your conversion tracking and remarketing tags correctly. Make sure these tags are designed to capture unique purchase events. Implementing server-side tracking or assigning unique event IDs can help differentiate transactions effectively. Also, ensure that each purchase triggers only a single event and double-check that remarketing scripts aren’t duplicated across different pages or events. By fine-tuning your tags and tracking logic, you can prevent duplicate purchase tracking and maintain accurate data.