

Adding interactive elements to your Shopify store can significantly improve user engagement, boost conversions, and increase order values. With features like pop-ups, quizzes, animations, and user-generated content, you can create a dynamic shopping experience that keeps visitors engaged. Here’s a quick breakdown of what you need to do:
- Check Theme Compatibility: Ensure your Shopify theme supports interactive features like app blocks and JSON templates. Use tools like Shopify's Theme Check to identify performance issues.
- Target Key Pages: Focus on high-impact areas like product pages (e.g., virtual try-ons), collection pages (e.g., style quizzes), and cart pages (e.g., free-shipping bars).
- Prepare Design Assets: Gather brand visuals, fonts, and pre-written text for a consistent look. Ensure email setup is optimized to prevent spam issues.
- Add Features: Use apps or custom code to implement pop-ups, animations, and quizzes. Keep them user-friendly and optimized for mobile.
- Incorporate User-Generated Content: Add customer photo reviews and social media feeds to build trust and showcase products in action.
- Test and Optimize: Regularly test features on different devices and browsers. Track performance metrics and refine based on data.
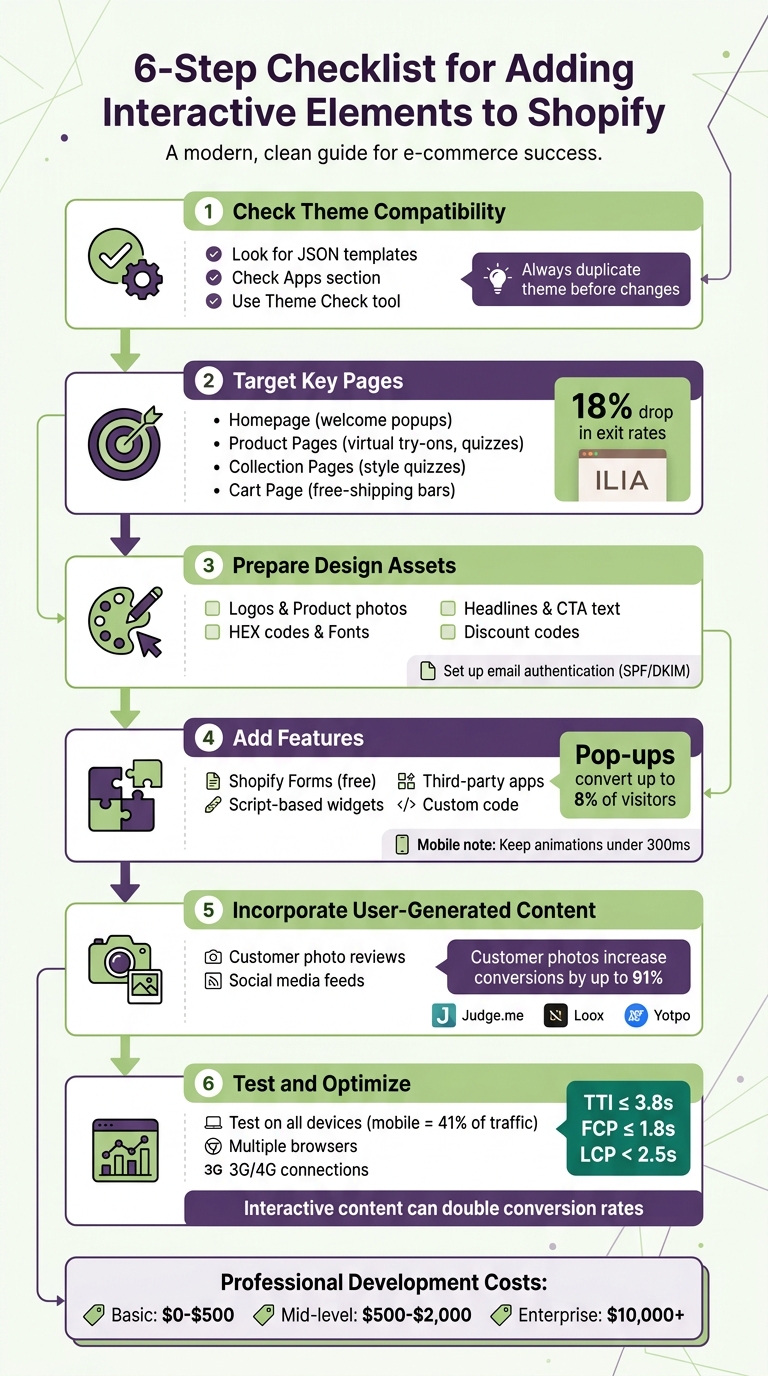
6-Step Checklist for Adding Interactive Elements to Shopify Stores
Add Interactive Product Hotspots to ANY Shopify Theme | 2025

sbb-itb-8b1a57a
Pre-Implementation Checklist
Laying a solid foundation for your store is critical. Skipping these steps can lead to issues like broken features, slow loading times, or poor mobile performance.
Check Your Shopify Theme Compatibility
Your theme must support modern interactive features. To confirm compatibility with Online Store 2.0, look for JSON templates (e.g., product.json, index.json) and a "Custom Liquid" block in the Theme Editor sidebar. You can check this by navigating to Online Store > Themes > Edit Code and reviewing the Templates folder.
Additionally, when customizing your Product page, look for an "Apps" section. This feature allows you to add app blocks for interactivity without needing to manually edit code.
Use Shopify's Theme Check tool to identify potential issues like performance bottlenecks, oversized JavaScript files, or code conflicts that might cause crashes when new features are added. Shopify emphasizes this in their development guidelines:
"JavaScript shouldn't be required for the basic functionality of your theme... instead, you should only use JavaScript as a progressive enhancement".
A quick way to test your theme: disable JavaScript using Chrome DevTools and check if core functions like navigation and product forms still work. If they do, your theme is well-optimized for handling interactive features. Always duplicate your theme before making any changes - this ensures you have a backup if something goes wrong.
Identify Target Pages and Features
To maximize conversions, focus on the pages where interactivity has the biggest impact. For example:
- Homepage: Use tools like welcome popups (timed to appear 7–10 seconds after landing) and product carousels to capture attention.
- Product Pages: Incorporate features that ease the buying process, such as virtual try-ons, hover-to-flip images, or shade-matching quizzes. In October 2024, beauty brand ILIA saw an 18% drop in exit rates and a 10% improvement in bounce rates after adding "find my shade" and "compare shades" tools. Similarly, Jones Road Beauty used a "Find My Shade" quiz to grow their email list while gathering customer data for retargeting.
- Collection Pages: Add style quizzes or display popups when users scroll past 8–12 products.
- Blog Posts: Use scroll-triggered popups at 60–70% depth to engage readers.
- Cart Page: Focus on increasing order value with free-shipping progress bars or exit-intent surveys.
Prepare Design Assets
Before diving into implementation, gather all your visual and written materials. Here's what you'll need:
- Logos, product photos, and lifestyle images that align with your store's branding.
- Your brand's HEX color codes and primary/secondary fonts to maintain visual consistency.
- Pre-written headlines, call-to-action text, and success messages. Use action-focused language for interactive tools.
- Discount codes, if you're offering incentives, which can be created in your Shopify admin panel.
Ensure your email authentication (SPF and DKIM records) is properly set up to keep lead-capture emails from landing in spam folders. Also, prepare GDPR-compliant consent snippets and update policies like refunds and terms of service to cover any new interactive features.
Having these assets ready upfront will streamline the implementation process, letting you focus on execution instead of scrambling for content mid-setup.
With these steps completed, you're ready to start adding interactive features to your store.
How to Add Interactive Features
Now that you’ve laid the groundwork, it’s time to explore how to effectively implement interactive features that can make a real impact. Whether you're a coding pro or prefer simpler tools, there’s an option for every skill level.
Add and Configure Pop-ups
When done right, pop-ups can convert up to 8% of website visitors into leads or sales. Here are four ways to add them to your Shopify store:
- Shopify Forms: This free app from the Shopify App Store allows you to create a "Popup Form." After installing, you can customize the design and text to align with your brand. Set triggers like page load, a time delay (10–20 seconds is ideal for low-intent visitors), or exit intent. Don’t forget to activate the theme app embed so the pop-up appears across your store.
- Third-Party Apps: Tools like POWR or Wisepops offer advanced features. Simply install the app, choose a template (e.g., discounts, newsletters, or announcements), tweak the branding, and integrate it with email tools like Klaviyo or Mailchimp.
-
Script-Based Widgets: If you want to avoid app overhead, copy a JavaScript snippet from your preferred tool and paste it into your
theme.liquidfile, just before the closing</body>tag. -
Custom Code: For greater control, create a custom snippet (e.g.,
custom-popup.liquid) with HTML, CSS, and JavaScript. Then, include it using{% include 'custom-popup' %}.
To keep the experience user-friendly, set frequency limits. Only show pop-ups once per session and suppress them for 7–14 days after a user dismisses them. Avoid displaying pop-ups on checkout or account pages to minimize friction during purchases. On mobile, ensure pop-ups are easy to close, don’t trap scrolling, and don’t take over the entire screen.
As Modalcast wisely puts it:
"A popup is not a channel, it is an intervention. If you do not define the 'job' first, you will end up measuring the wrong things".
After installation, test the pop-up in an incognito window to ensure it doesn’t appear multiple times or disrupt your layout.
Add Animations and Hover Effects
Interactive websites see 52.6% more user engagement compared to static ones. Many modern Shopify themes, like Dawn or Mavon, come with built-in animation options such as "Reveal sections on scroll" or hover effects. You can toggle these features in the Theme Editor.
For simple effects like button color changes or hover animations on product grids, custom CSS is a lightweight and efficient choice. Stick to properties like transform and opacity for smooth animations without slowing down your site.
For more advanced interactions, such as 3D product views or scroll-triggered animations, JavaScript libraries like GSAP (GreenSock) or WOW.js are excellent tools. If coding isn’t your strong suit, apps like Slider Revolution, Instant, or PageFly offer drag-and-drop animation builders.
A few tips for optimizing animations:
- Keep mobile animations under 300ms and desktop ones under 500ms.
- Use the
prefers-reduced-motionmedia query in your CSS to respect users’ system settings. - Trigger animations on hover for parent containers (e.g., product cards) instead of individual elements for a smoother experience.
- Avoid parallax effects on mobile devices - they can be disorienting for some users.
Install Quizzes and Calculators
Quizzes and calculators go beyond visuals, offering a personalized shopping experience. Interactive quizzes, for instance, boast conversion rates of 25–40%, far above the average 2.86%. Acting as virtual sales assistants, they help narrow down product options to a few tailored recommendations.
For Shopify’s Online Store 2.0 themes, quizzes can be added using App Embeds or by pasting JavaScript code into a Custom Liquid section. Popular tools include:
- Outgrow: Starting at $14/month
- Octane AI: $50/month
- Quiz Kit: Free plan available, with paid options starting at $59/month
- Typeform: Starting at $28/month
Keep quizzes short - 6 to 10 questions is ideal. Completion rates drop by 15% for every question beyond eight. Use branching logic to make quizzes adapt based on previous answers, and include images in answer options to boost completion rates by 31%.
To capture leads, ask users to provide an email address in exchange for personalized results or a discount code. This approach gathers valuable zero-party data, which is more effective for personalization than relying on third-party cookies. With 88% of online shoppers wanting personalized recommendations, this strategy aligns with consumer expectations.
Finally, integrate your quiz with email marketing platforms like Klaviyo to send tailored follow-ups based on quiz results. When embedding code manually, add align="center" after the opening <div> tag for proper alignment, and enable the "Auto-resize embed to fit quiz content" option to avoid awkward scrollbars.
Adding User-Generated Content
Customer photos and reviews have a powerful effect on driving conversions. They act as social proof, showing potential buyers how real people are using and loving your products. In fact, customer photos can increase conversions by up to 91% and boost product page conversion rates by 29%–64%. By 2026, visual social proof is expected to become a must-have for staying competitive.
Enable Customer Photo Reviews
Collecting customer photos is easier than ever with the help of review apps that allow visual uploads. Options like Judge.me (free to $25/month), Loox ($79–$299/month), and Yotpo ($100–$500+/month) let customers attach photos and videos to their reviews. If you're using Shopify's Online Store 2.0, these apps integrate seamlessly as Theme App Extensions. This means you can add photo galleries to your store's layout with a simple drag-and-drop, no coding required.
To get more photo reviews, don’t just ask for generic feedback - be specific. Explicitly requesting photos can boost submission rates by a whopping 340%. Timing matters too. Send review requests 7–14 days after delivery, giving customers enough time to try out your product. To sweeten the deal, offer tiered rewards. For instance, you could give 50–100 loyalty points for text reviews, 150–200 points for photos, and 300–500 points for videos.
Moderation is key to maintaining quality. Set up a review queue to filter out blurry, irrelevant, or off-brand photos. Many platforms now use AI to catch fraudulent reviews and doctored images. Once approved, display your photo gallery prominently - like near the top of product pages or beside the "Add to Cart" button - to grab attention. You can also make photos shoppable by tagging products directly within them.
Beyond reviews, integrating live social content can further boost engagement.
Display Social Media Feeds
Adding Instagram or TikTok feeds to your store is a great way to showcase how your products are used in real life. Apps like Socialphotos ($19–$55/month), Instafeed ($8–$20/month), or Covet ($9.99–$79.99/month) make this easy by automatically pulling in fresh content from Instagram mentions, branded hashtags, and customer uploads. This ensures your feed stays up-to-date with minimal effort.
To set this up, you’ll need an Instagram Business or Creator account linked to a Facebook Page to enable API functionality. Use moderation tools within these apps to approve only high-quality, on-brand images. Placement matters too. Consider adding these feeds to your homepage for instant credibility, to product pages to show items in action, or to a dedicated "Lookbook" page for inspiration.
Always get explicit permission before using customer photos for marketing or ads. Many apps include built-in tools to help manage rights and permissions. To encourage more submissions, try running hashtag challenges like #YourBrandGiveaway or offer perks, such as a 10% discount for tagging your store.
As e-commerce expert Alisa Nemova puts it:
"UGC is trust on display. Nothing builds credibility faster than real customers showing real results".
Testing and Maintenance
After launching interactive elements, it's essential to test them regularly to ensure they work seamlessly across all devices and browsers your customers use.
Test on All Devices
With mobile devices accounting for 41% of all e-commerce traffic, testing on actual phones and tablets is a must. Emulators often miss important details like touch interactions and how content renders on real screens. For a better user experience, ensure that interactive buttons and sliders meet the recommended minimum touch target size of 44x44 pixels - this makes them easier to use on smaller screens.
Start with Chrome DevTools' device mode to check responsiveness across different screen sizes. Then expand testing to the latest two versions of major browsers - Chrome, Safari, Firefox, and Edge - on both Mac and PC. It's equally important to test your site on slower 3G and 4G connections, as what loads in three seconds on fast Wi-Fi might take eight seconds on mobile data. Aim for a load time of three seconds or less to keep users engaged.
Shopify's "Bogus Gateway" is a helpful tool for testing the entire shopping journey - from adding products to the cart to completing a purchase - without processing real transactions. This can help uncover bugs like disappearing items in the cart or overlapping buttons on mobile screens.
Once you've verified device responsiveness, shift focus to performance metrics to measure how well your interactive elements are working.
Track Performance Metrics
Performance metrics are key to understanding how interactive elements impact user engagement and sales. Keep an eye on engagement stats like dwell time, interaction rates, and bounce rates, as well as sales metrics like conversion rates and add-to-cart percentages.
Interactive content can double conversion rates compared to static content, but only if it loads quickly. Use tools like Google PageSpeed Insights to ensure your site stays fast. Target a Time to Interactive (TTI) of 3.8 seconds or less and a First Contentful Paint (FCP) of 1.8 seconds or less. Even a one-second delay in mobile load time can reduce conversion rates by up to 20%.
For example, in October 2024, beauty brand Dermalogica optimized their Shopify store's performance, achieving a 44% improvement in site speed and a 14% drop in bounce rate. These changes led to a 119% sales increase and a 45% boost in conversion rate. Similarly, ILIA, another beauty retailer, introduced interactive tools like "find my shade" and "compare shades", which reduced their exit rate by 18% and improved their bounce rate by 10% in 2024.
Refine Based on Data
After thorough testing and tracking, use the insights to refine your interactive elements. Conduct A/B tests over at least two weeks, ensuring enough conversions for statistically reliable results. Compare pages with and without interactive features to measure their impact on conversion rates and revenue. For most Shopify stores, A/B testing one change at a time works best, as multivariate testing requires higher traffic volumes than most stores typically have.
Gather user feedback through post-interaction surveys to understand whether the interactive elements genuinely helped in their decision-making. Combine this qualitative data with your performance metrics to identify areas for improvement. Testing on actual mobile devices - not just emulators - can help catch issues like unresponsive buttons or hard-to-read text.
To maintain fast load times, keep 3D models under 5MB and limit them to 50,000 polygons. Also, ensure your Core Web Vitals meet these benchmarks: LCP under 2.5 seconds, TBT under 200ms, and CLS under 0.1. This not only improves user experience but also helps with search rankings.
Working with Professional Developers
Shopify apps are great for quick installations, but when it comes to advanced features like 3D product previews, dynamic pricing, or custom product configurators, you’ll likely need professional developers. Agencies like Martin Monroe Creative specialize in using frameworks like React and JavaScript to seamlessly integrate complex, interactive elements into your store.
Once you bring in professional developers, the focus shifts to ensuring your site performs at its best. Poorly optimized features can slow down your store and hurt conversions. Experts address this by using techniques like lazy loading, asynchronous scripts, and asset optimization to keep load times fast and maintain strong Core Web Vitals. With over 70% of Shopify traffic coming from mobile devices, developers also ensure your custom features work flawlessly on various screen sizes and operating systems - all without sacrificing speed.
Cost is another important factor. Professional development pricing depends on the complexity of the project. Basic implementations, often app-based, range from $0–$500. Mid-level projects typically cost between $500 and $2,000, while enterprise-level custom builds, like advanced product configurators, can exceed $10,000. Despite the upfront costs, investing in a unified infrastructure can lower total ownership costs by up to 37% and reduce annual third-party support expenses by 89%.
Professional developers also handle ongoing integration, ensuring interactive elements connect seamlessly with your marketing tools. For example, they can link product quizzes to email platforms for personalized follow-ups or use Shopify Flow to automate behavioral triggers. In 2024, cereal brand Magic Spoon partnered with developers to sync inventory and customer data between their Shopify store and social storefronts, turning viral TikTok content into significant sales.
When considering an agency, start by reviewing customer support tickets and return reasons to identify where custom tools could make the biggest impact. Compare your performance against leading brands in your niche to pinpoint areas for improvement. Stores with well-designed product configurators often see conversion rates 2-3 times higher than standard product pages and enjoy a 30-50% boost in average order value. These results highlight the value of professional expertise.
Conclusion
Adding interactive elements to your Shopify store isn't about throwing in flashy features - it's about purpose. Every element should have a clear role, whether that's capturing leads, boosting conversions, or increasing average order value. Start by checking your theme's compatibility, preparing your design assets, and choosing between Shopify apps for ease or script-based widgets for more control and performance.
Once your goals are set, timing and frequency become key. Popups, for example, should appear at the right moment without overwhelming users - frequency caps are a must, and checkout pages should always be free of disruptions. Remember, interactive content can double conversion rates compared to passive content, but only when executed thoughtfully.
Keep a close eye on both outcome metrics (like revenue per session) and guardrail metrics (like bounce rates) to ensure your features enhance, rather than harm, the user experience. Mobile optimization is non-negotiable - every interactive element must work seamlessly on smaller screens without blocking navigation or trapping users.
If your needs go beyond basic app capabilities, it might be time to bring in professional developers. For advanced tools like custom product configurators, 3D viewers, or detailed calculators, agencies such as Martin Monroe Creative can handle the heavy lifting. They manage technical aspects like lazy loading and asynchronous scripts while ensuring smooth integration with your marketing tools.
Start small. Introduce one high-impact feature, monitor its performance, and make adjustments based on real data. The most successful stores aren't packed with endless features - they're the ones that use interactive elements strategically to address customer needs and deliver measurable results. By focusing on careful planning, testing, and optimization, you’ll ensure that every interactive element serves a meaningful purpose.
FAQs
Which interactive feature should I add first?
Start with a popup as your first interactive feature. When used thoughtfully, a well-placed popup can serve multiple purposes: gathering feedback, reducing cart abandonment, or capturing emails and SMS in exchange for an incentive. The key is to define its main goal - whether that's collecting customer insights, boosting order value, or growing your leads - and then fine-tune its timing and message to match.
For example, popups aimed at email collection or promoting special offers work well to engage visitors right away. They also help you build your contact list early, setting the stage for ongoing communication and future marketing efforts.
Will pop-ups, quizzes, and animations slow my Shopify store?
When done right, pop-ups, quizzes, and animations won't drastically affect the speed of your Shopify store. In fact, these features can drive engagement and conversions if handled carefully. To keep your site running smoothly, stick to best practices like keeping designs simple, targeting specific audiences, and fine-tuning images and scripts. With proper integration, these interactive elements can improve user experience without slowing things down.
Do I need a developer or can I do this with apps?
You can add interactive elements to your Shopify store - like pop-ups or banners - using apps or Shopify's built-in tools. The best part? You don’t need any coding skills or a developer for most of these features. If you're aiming for something more advanced, like intricate animations or heavily customized designs, you might consider hiring a developer. That said, the majority of commonly used features are simple to set up with Shopify's native tools or third-party apps.